
Media Street have been offering a diverse range of digital services to local and international businesses for over 10 years. With a credible client portfolio and a wide knowledge of all-things-digital, we have helped businesses grow through creative website and graphic design, successful marketing campaigns and competitive hosting packages, plus much more. Take a further look into our latest news articles, learn more about our staff and how we can help your business excel with our FAQs and testimonials
Access and Manage your accounts with Media Street. To login to your client areas please select the relavent link below.
We're proud to be a full service digital agency. For a list of our services please navigate services using the menu to the left, or choose a service category below.
Alternatively you can view all of our services below:
View AllAs Head of Graphic Design at Media Street I occasionally have to design multiple page documents. I always knew that Adobe InDesign had the feature to enable automatic page numbering, but only just got around to learning how to apply it, as usually when a job like that turns up it is needed in a hurry, and when you’re rushed you don’t neccessarily have the time and patience to start learning new ways of doing things.
Have you ever wondered how to create page numbers on a multiple page document in InDesign CC without having to manually type and set the font on every page? Well now you don’t have to, just follow this simple step-by-step guide to using Master Pages…
1. Press Ctrl + ‘N’ to set up a new document. Choose your new document size and don’t forget to add some bleed (usually 3mm) if it’s going to print. To start off with, choose just one page for this.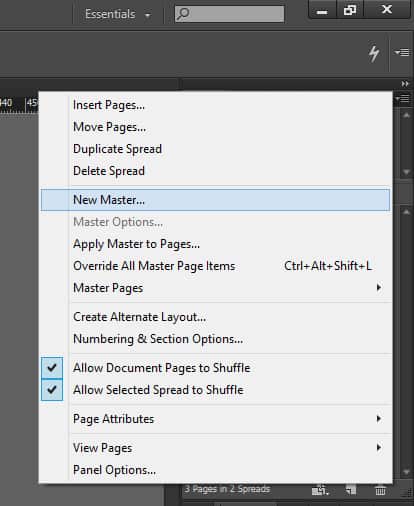
2. When your document opens, go to the Pages panel at the top and you will see A-Master. Double click on the left hand page. Create a text box on this page (don’t type anything in the box), then go to Type > Insert Special Character > Markers > Current Page Number. You will see a capital ‘A’ appear in the text box. You can now apply a different font, size, colour etc. to this and align it to the bottom left corner, if preferred. You could even put it on a strip of colour and align it centrally, the choice is yours.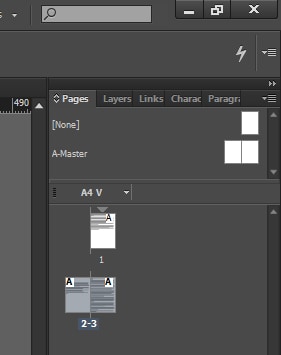
3. You can now apply this to the other side, so select everything you want to duplicate with the selection tool, then hold down ‘Alt’ + ‘Shift’ or ‘Option’ + ‘Shift’ on the Mac, and move your selection to the right hand page. This will now set up right hand page numbers.
4. New master pages can also be set up for headers or for a repeating background image perhaps. To do this either right click above ‘A-Master’ or click the top right corner of the Pages panel for the menu, and choose ‘New Master’, if you base this on A-Master it will apply the new items alongside the previous page numbers that you just set up, but if you leave it based on ‘none’ it will only apply this new master page. You can now create your new header or background image in the same way as you set up the page numbers.
5. Once you have created your master pages, if you click on the Create new page icon at the bottom of the Pages panel you will see new pages appear with page numbers. To apply your second master page, simply drag it from the top of the Pages panel onto the page you wish to apply it to. You can also edit individual pages, as you might want to change the colour of a page number because its hard to read over a photo for example. To do this just press ‘Control’ + ‘Shift’ (‘Command’ + ‘Shift’ on a Mac) and select the page number, this now allows you to edit this alone.
With almost everything in InDesign, there are different ways of doing things and shortcuts, so once you have followed this, you may find your own ways. For instance, you might only want page numbers on the right hand page and to have a strapline on the left hand page. But hopefully this tutorial will start you off easily and help get the basics.
Do you need help with your next brochure? Please contact me at Media Street on 01392 914033 (Barry) or [email protected]


 01392 914033