
Media Street have been offering a diverse range of digital services to local and international businesses for over 10 years. With a credible client portfolio and a wide knowledge of all-things-digital, we have helped businesses grow through creative website and graphic design, successful marketing campaigns and competitive hosting packages, plus much more. Take a further look into our latest news articles, learn more about our staff and how we can help your business excel with our FAQs and testimonials
Access and Manage your accounts with Media Street. To login to your client areas please select the relavent link below.
We're proud to be a full service digital agency. For a list of our services please navigate services using the menu to the left, or choose a service category below.
Alternatively you can view all of our services below:
View AllHi there folks – as promised here’s the latest instalment of my email signature tutorial series, focusing on Apple Mail.
Although not a mac owner myself (it’s always been PC’s for me I’m afraid) we have many customers here at Media Street who are “mac mad” and swear by Apple’s products. I am therefore required to get used to all the slight variants and intricacies of their product range in order to advise and help our customers.
One question mac users always ask me without fail is “how do I create an email signature?” so it made sense to turn the answer into a quick blog story.
1. Open up Apple Mail and select “Preferences” from the Mail menu.
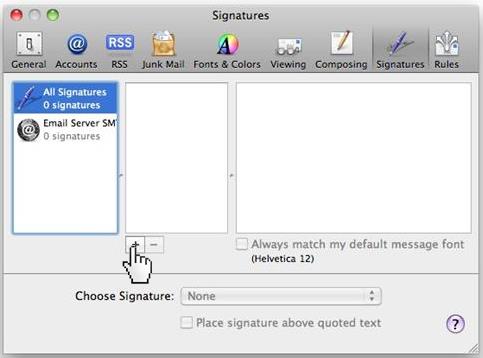
2. In the Mail Preferences window, click on the Signatures icon.
3. If you have more than one email account set up, simply select the email account which you want your new email signature added to.
4. Click on the plus (+) icon located near the bottom of the window.
5. Next, type in a description for your email signature.
6. Apple Mail will automatically create a signature for you, using information from the selected email account. Replace the default text with your desired signature text.
7. When you’re fully satisfied with your new email signature, simply close the Signature window. Alternatively, you can repeat the process to create any additional signatures.
1. To select an email signature, select “Preferences” from the Mail menu.
2. In the Mail Preferences window, click on the Signatures icon.
3. If you have more than one email account set up, select the email account that you want your new signature to apply to.
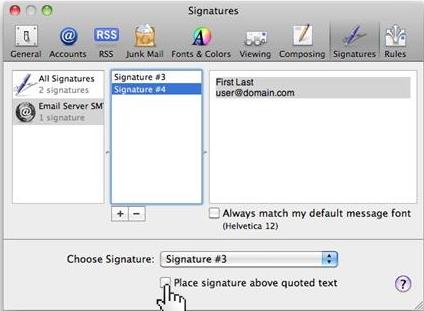
4. Select your desired signature from the “Choose Signature” drop-down menu (at the bottom of the Signatures window).
5. Make sure you check the “Place signature above quoted text” box to ensure that your new signature is positioned correctly when you reply or forward emails – and not right at the bottom where it may not be seen!
6. Next, simply close the Signatures window and hey presto – you’ve just created your new signature!


 01392 914033