
Media Street have been offering a diverse range of digital services to local and international businesses for over 10 years. With a credible client portfolio and a wide knowledge of all-things-digital, we have helped businesses grow through creative website and graphic design, successful marketing campaigns and competitive hosting packages, plus much more. Take a further look into our latest news articles, learn more about our staff and how we can help your business excel with our FAQs and testimonials
Access and Manage your accounts with Media Street. To login to your client areas please select the relavent link below.
We're proud to be a full service digital agency. For a list of our services please navigate services using the menu to the left, or choose a service category below.
Alternatively you can view all of our services below:
View All
A Raspberry Pi is a credit-card sized computer that was created & developed in the UK to help a new generation of programmers that have the desire to be able to build anything & everything, on a budget, with their imaginations being the only limitations.
The way Raspberry Pi dealt with this was to offer:
What Can You Use a Raspberry Pi for? What’s some working, day to day, examples?
You could:
Now this guide will only skim through all the “getting started” aspects of setting up a Raspberry Pi. At all times I recommend you also use Google to search for other tutorials (everyone has a different approach) and also use the main Raspberry Pi Foundation website. They’ve recently launched a new version of their site which is super easy to use – so definitely research as many websites as possible whilst exploring the possibilities of Pi’s.
Once you’re ready to get started though you’ll want to look at getting the following:
All the above items you can get separately from a website like Amazon or eBay. Equally you’ll see “Starter Kits” like this one as well. It’s totally down to you whether you get them as separate items or a “Starter Kit” there’s no real difference – that being said I’ve found personally that the Starter Kits normally provide poor quality SD cards with a small amount of storage (i.e 2-4GB) – which I think is a bit limiting personally.
Click on the image below to see an enlarge version of the diagram.
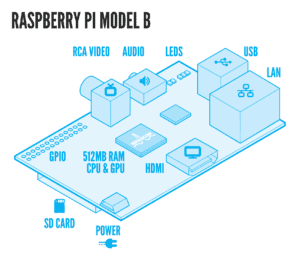
Out of the box you can connect your Raspberry Pi to a normal computer screen (using VGA) or a HD Display/TV (using HDMI). The choice is yours, you can only use one display at a time though, so you have to pick one. You’ll also need to plug a keyboard and mouse to your Raspberry – this needs to be done via USB cables.
As standard your Pi won’t have a Operating System (OS) on it, so this is your first step, setting up the OS. To do this, if you have a starter kit, you can just turn it on and NOOBs will be pre-installed on the memory card. Therefore when you turn it on you’ll see a list of operating systems you can install and it’s all nice and straight forward!
I don’t have NOOBs pre-installed on my memory card
Not a problem, you’ll need to do two things to get a OS working on your Raspberry Pi.
Once you’ve done the above you can put the SD card in your Raspberry, power it up and then you can choose and install a Operating System of your choice.
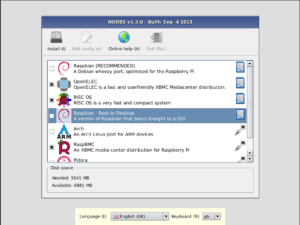
What OS Should I Install?
This really depends what you want to do with your Raspberry. I’d recommend Raspbian though – this, to me, is the best OS on Raspberry’s also most of the online tutorials you see use Raspbian, so it’s great to start off with.
Now that you’ve got your Raspberry working and installed a OS (Raspbian) you can get playing with it! If you plug in a LAN (Internet) cable you’ll be able to browse the internet. Equally you have simple text editors, games and other pre-installed applications you can play with. Once you’ve done this though, naturally, you’ll want to start thinking about expanding on what you’ve learnt!
Why not consider the following:
Build your own Dropbox Alternative. A tutorial can be found here and it’s nice and easy to follow. I’ve built a couple of these systems and they work fine. The upload speed is a bit of an issue but, in theory, within less than 40minutes you should be able to create a system where you can store all your files & data. This will then sync with your computer, mobile devices etc. etc.
Build a Low Cost HD Surveillance Camera. A tutorial can be found here and this project is suitable for beginners. It’s a nice idea and, again, I’ve built a few of these with no issues. In short you end up plugging your Raspberry Pi up with a 5MP HD camera which then streams the footage live over the internet. You can then set it up so you get SMS or Email alerts when any motion is detected.
Build a Media Centre for your Home. A tutorial can be found here and, again, this is more than suitable for anyone getting started on a Raspberry. The fundamentals of this tutorial are you use your Raspberry Pi as a way to store media (videos, music etc.) which can then be plugged into your TV. You can then play all your media as well as use the Raspberry Pi’s Internet Connection to browse the Internet on your TV. I like this idea/project – I’ve not done it as I have a smart TV already, but if I didn’t I’d definitely sort one of these out as for under £50 you can really improve your TV’s functionality.
If none of these projects take your fancy I’d recommend reading CNET’s “25 Fun Things to do with a Raspberry Pi”
When looking to extend your Raspberry Pi and turn it into a AWESOME gizmo you might start thinking “Can I do this” – to help get your imagination going I’ve listed out some hardware I use below to extend my Raspberry Pi.
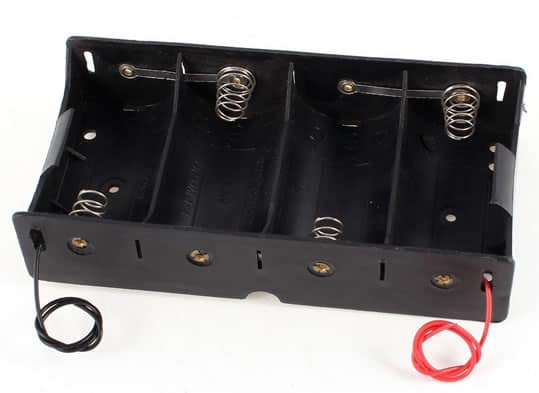
Battery Pack – Want to make your Raspberry Pi portable? 8x AAA batteries give you just over a 10V power supply. So add a 5V restrictor to this and you can have a portable Raspberry Pi! Roughly speaking doing this has allows around 7-10hrs “operating” hours till it needs re-charging. This though is massively affected though if you’re doing demanding stuff on your Pi whilst operating off batteries.
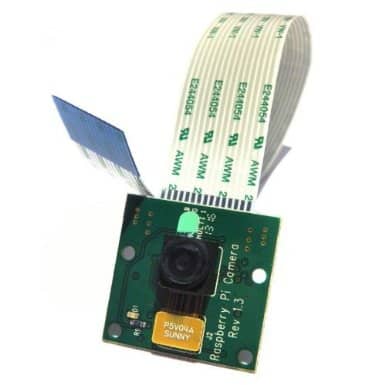
Camera – These are easy to set up on Raspberry’s and cost less than £20! Quickly build your own HD Video Camera, Portable Camera, build a surveillance camera, wildlife camera… your imaginations the limit! Equally, you can expand on these camera’s and install a free motion sensor add-on script that makes it good for alarm systems.
Raspberry Pi is a great way to get into building electronics. It’s expandable, limitless and can be done at a low-cost. This guide really just brushes over some of cool things you can do with your Raspberry. If you’ve got one and use it for anything cool then please let us know below by leaving a comment. Equally if you have any questions on Raspberry’s then ask below – I’d be happy to get back to you.


 01392 914033