 01392 914033
Offices are currently closed
One of the questions I’m most frequently asked about in regards to emails and web hosting is how to create an Email Signature that automatically appears at the bottom of any new message. In fact, as recently as last week I was requested to write a tutorial for an Exeter based client who wanted all their staff to have new signatures added and were unsure of how to go about this.
So, over the next few weeks I will be explaining how to create and add a simple email signature within the most common email applications – starting today with Outlook 2010.
1. Start by opening Outlook and then open a new message. Next, click on “Signature” which is located in the “Include group” on the Message tab.
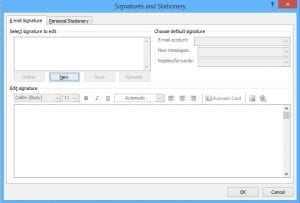
2. Click on “New” on the email Signature tab to create a new signature.

3. Type in a name or description for this signature (this enables you to configure multiple signatures and assign them to different accounts).
4. Within the Edit signature box, type in the signature you would like to have and format this as you wish using the text editing buttons above. For instance you may want to have your company name in bold to provide some contrast; or perhaps have your name a slightly larger font than your telephone number.
5. Once you are happy with how your signature looks, click “OK” to finish.

I will be adding more email signature tutorials for Windows Live, Thunderbird and Apple Mail shortly, so watch this space! In the meantime take a look at Tech3’s 50 funniest email signatures of all time here.